Music is good for the health. The world can’t survive without good music.
If you have a passion for music, write music, or want to be uploading music to the internet for download, you should know How to Start a Successful Music Blog to promote yourself to a broader audience.
The best way to showcase your talent to the world is through the internet. You have a higher chance of reaching a significant amount of people and increase your fan base.
This guide will be straight to the point. Things you will learn from this article include:
- How to Start a Music Blog (Generally)
- How To Start A Music Review Blog (To Only review Music)
- How To Start Your Own Music Blog (For Artists)
- How To Start A Music Download Website
- How Do Music Bloggers Make Money?
- How Do I Download Music To My Blog?
- How to create essential pages for a Music Blog
- How To upload your first music to your Blog
Things To Know Before Starting A Music Blog
Before starting your music blog, you must be aware of what it takes to run a music blog. If you are an artist, you have no problem to face since you will be uploading your Recorded songs to your blog.
Starting a Music Review blog shouldn’t be a problem too, just make sure you have permission granted. Some artists don’t want their music reviewed, and they might report your blog for copyright infringement- if you do so.
If you aren’t granted permission, don’t upload music you do not own. It’s a problem you should avoid. Although, in some countries, artists don’t care if you use their music on your site. They see it as a free promotion, while some musical artists even pay bloggers to upload their songs.
Now let’s get to business…
How To Start A Successful Music Blog in 7 Steps
Below are 7 steps for creating a music blog. You don’t need to be techie, just follow carefully. Everything should be ready in 15 minutes.
1. Pick A Good Domain Name
The very first step here is picking a good domain name for your music blog. A domain name is a blog name. Example – mymusic.com.
You want to make sure you choose a unique and sweet name. It should be short so people could easily remember it.
If you are an artist, you will love to use your stage name (yourstagename.com). It will sound unique to your fans, and they will easily remember it since they already love your music.
For a Music Review Blog or Music download site, just make sure your domain name doesn’t include a celebrity name, so you won’t be charged for impersonation.
You should start thinking of a few domain names. You will be choosing one in step 2.
2. Choose A Reliable Web Host
Web hosting companies are responsible for putting your blog or website live for at least 24hours a day. You can’t run a blog without hosting it on a server.
There are thousands of web host companies out there. Not all offers quality features. You should choose a hosting company that can keep your site up 24/7 at a reasonable rate.
This is why I recommend A2 Hosting. They provide unique features such as:
- Unlimited SSD Space & Transfer
- Free & Easy Site Migration
- Free Automatic Backups
- Speed Optimized WordPress
- 99.9% Uptime Commitment
- 24/7/365 Guru Crew Support
- Free SSL Certificate
- Anytime Money Back Guarantee
You will also get your domain name from them. Now Head over to A2 Hosting Here. On the homepage, click on “Get Started”.

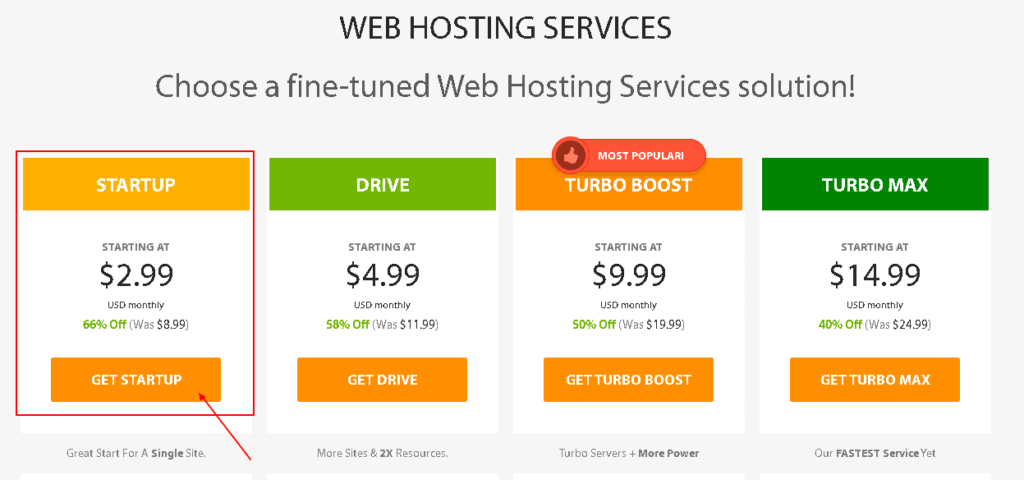
You will be taken to the web hosting pages with various plans available. Since you are just starting, and you are hosting only 1 website. The Start-Up plan is enough and affordable. Now, Click on “Start Up” button.
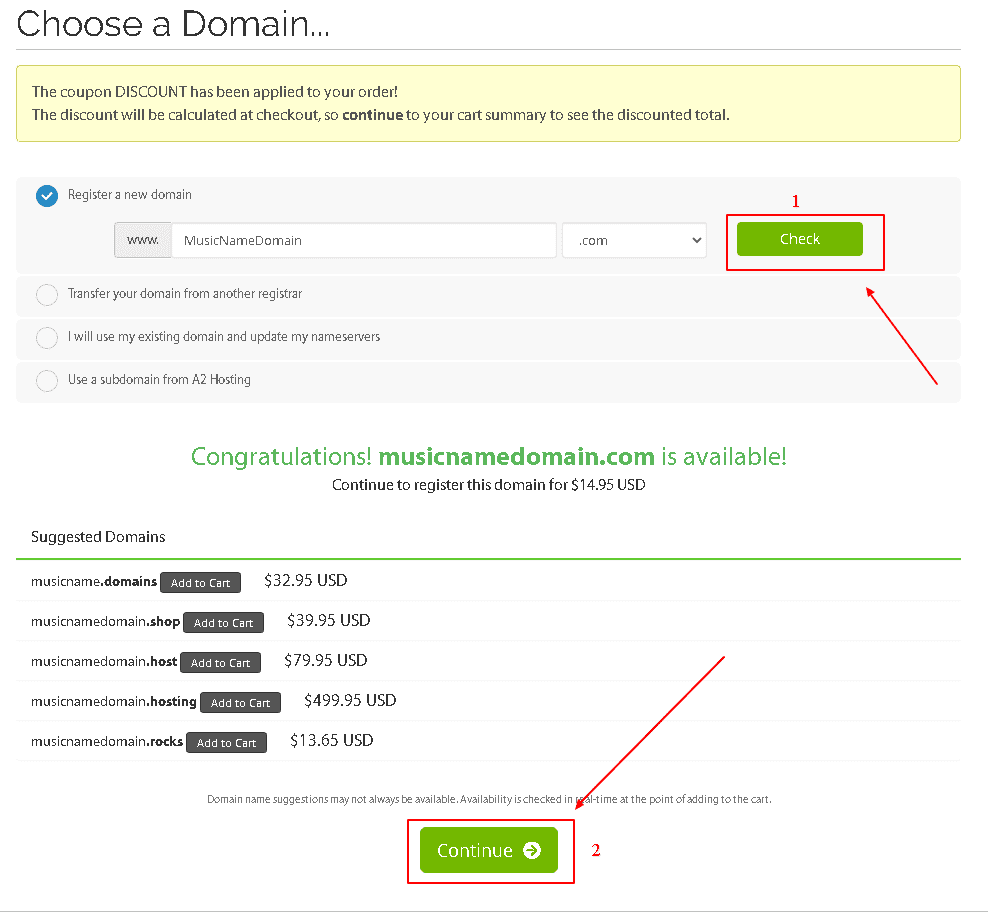
Now you will land on a page where you will choose a domain name (as discussed above). If you own a domain name elsewhere, you can use it by clicking on “I will use my existing domain and update my nameservers”.
Since you are starting a new music blog, you should enter a new domain name you want. For this tutorial, I will use “MusicNameDomain.com” as an example.
After entering the domain name you want, click on “Check” if it’s available. Scroll down and click on “Continue”.
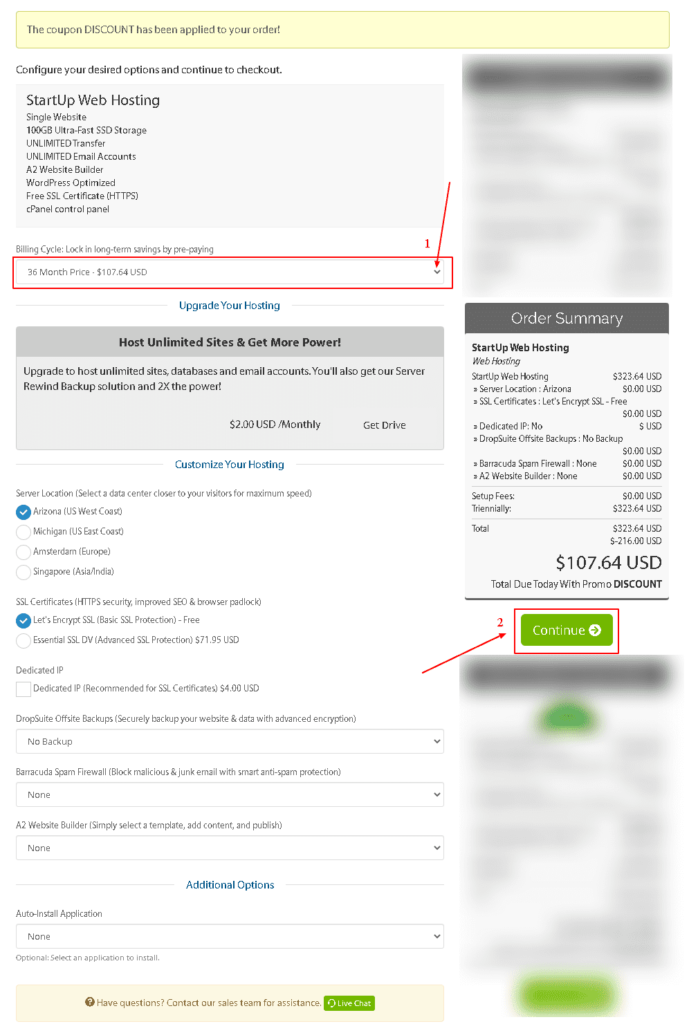
You will land on the cart page where you can place your order. You should choose the most affordable billing cycle. It’s wise to go for 36 months (3 years) plan because it’s cut costs. See the pricing below:
- 12 Months price – $83.88
- 24 Months price – $105.36
- 36 Months price – $107.64
Now choose the price and duration you want (36 months is advisable). Leave other things the way they are. Now Click on “Continue” under the Order Summary.
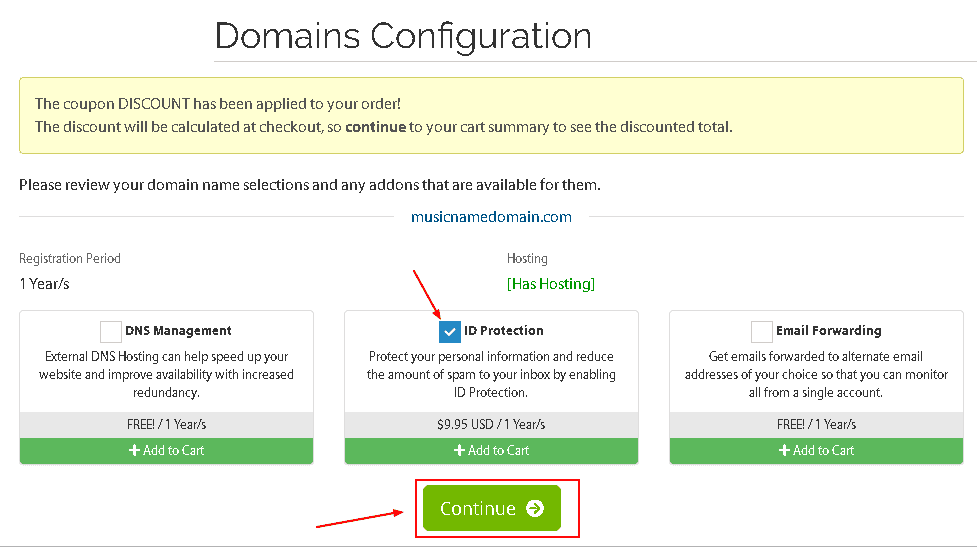
You will then see a domain configuration page. It’s vital to thick the “ID protection” box. You want to keep your identity safe on the internet. The 2 other boxes are not necessary (for now). Now, Click on “Continue”.
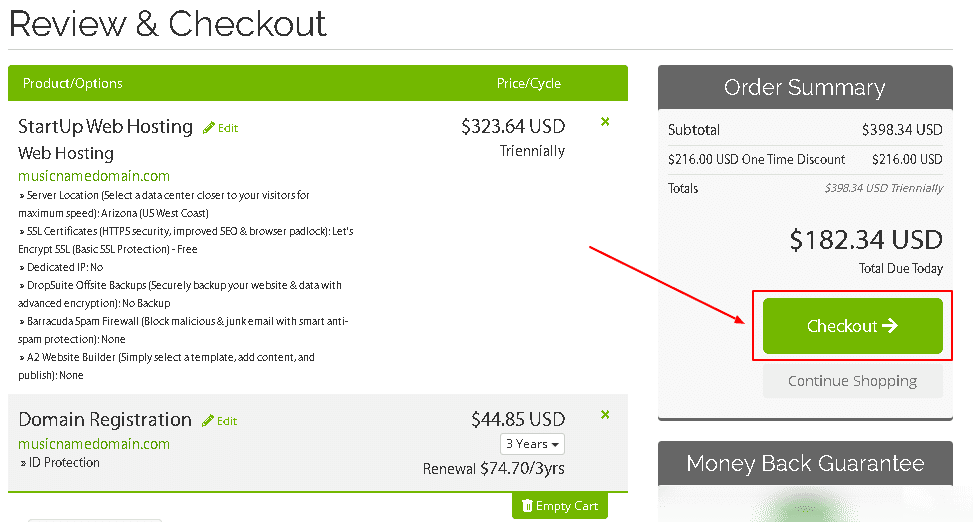
You will be taken to the final checkout page. You can choose the domain name purchase duration. A good idea is to let it tally with web hosting. If you are paying for 3 years web hosting plan, pay for a 3 years plan for the domain.
Since I used 3 years for both web hosting and domain name plan in this tutorial, the final payment will be $182.34. If you have a low budget for your music blog, you can select a yearly plan.
After confirming everything is fine, click on “Checkout” under the Order Summary.
You will be taken to a signup page. Fill all information appropriately. Choose a strong password you can remember. Pick your best payment option. Remember to click on “I have read and agree to the Terms of Service” and finally click on “Complete Order.
If you have gotten to this stage, your blog is 90% set. Remember, you will use the information you filled to login to your A2 Hosting Cpanel.
To the next step…
3. Install WordPress CMS
WordPress is the platform you will be using to operate your blog. Things like creating pages, publishing songs, uploading music will be done from your WordPress Admin section.
One good thing is that WordPress is free. You have full control of your blog without paying a dime. A2 Hosting made it easy to install WordPress.
Log in to your A2 hosting Control panel (the username and password you choose the other time). Click the WordPress A2 Optimized link, which is located in the Softaculous App Installer section.
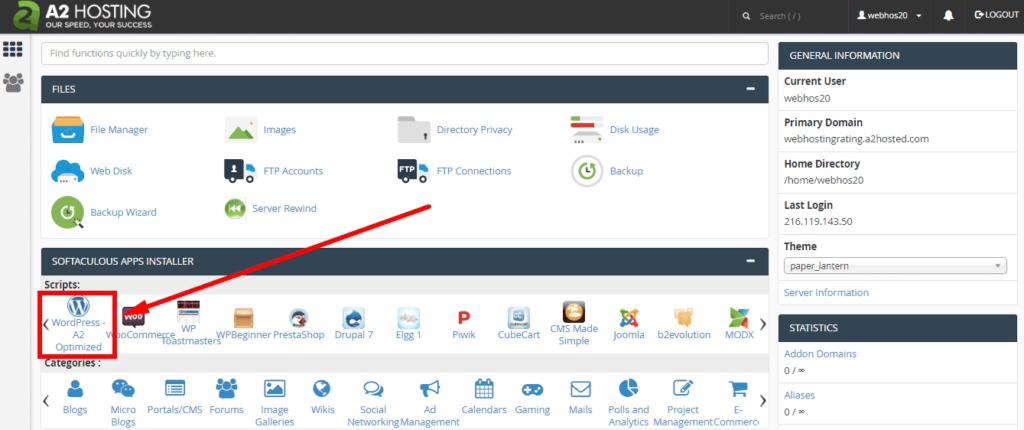
It will bring you to the WordPress installation section.
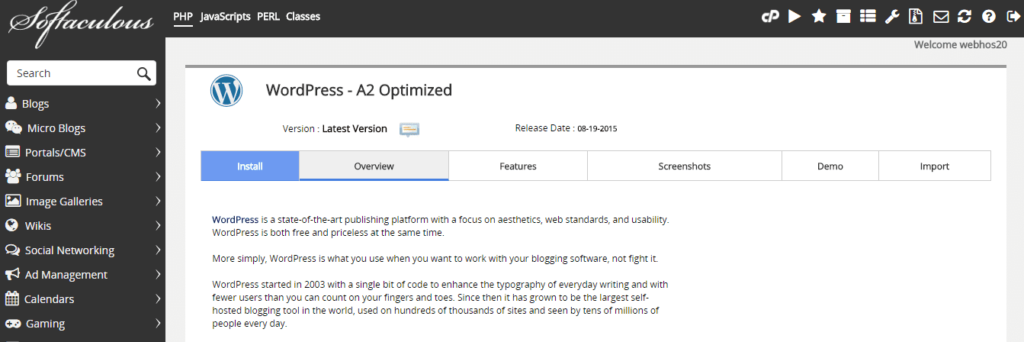
Now, Click the Install button. Fill the installation details accordingly. See how to fill them correctly.
1. Choose protocol: https://www
2. Choose domain: Put in the domain name you purchased the other time.
3. Install in directory: Leave it blank
4. Site name: The name of your WordPress site (put anything you want and change it later).
5. Site description: The description or “tagline” for your WordPress site
6. Admin username: Choose a username for your WordPress Dashboard login (something you can remember).
7. Admin password: Enter a password for your WordPress Dashboard login (something you can remember).
8. Admin email: Enter an email address for your WordPress Dashboard login.
9. Select language: Choose your language, Preferably English
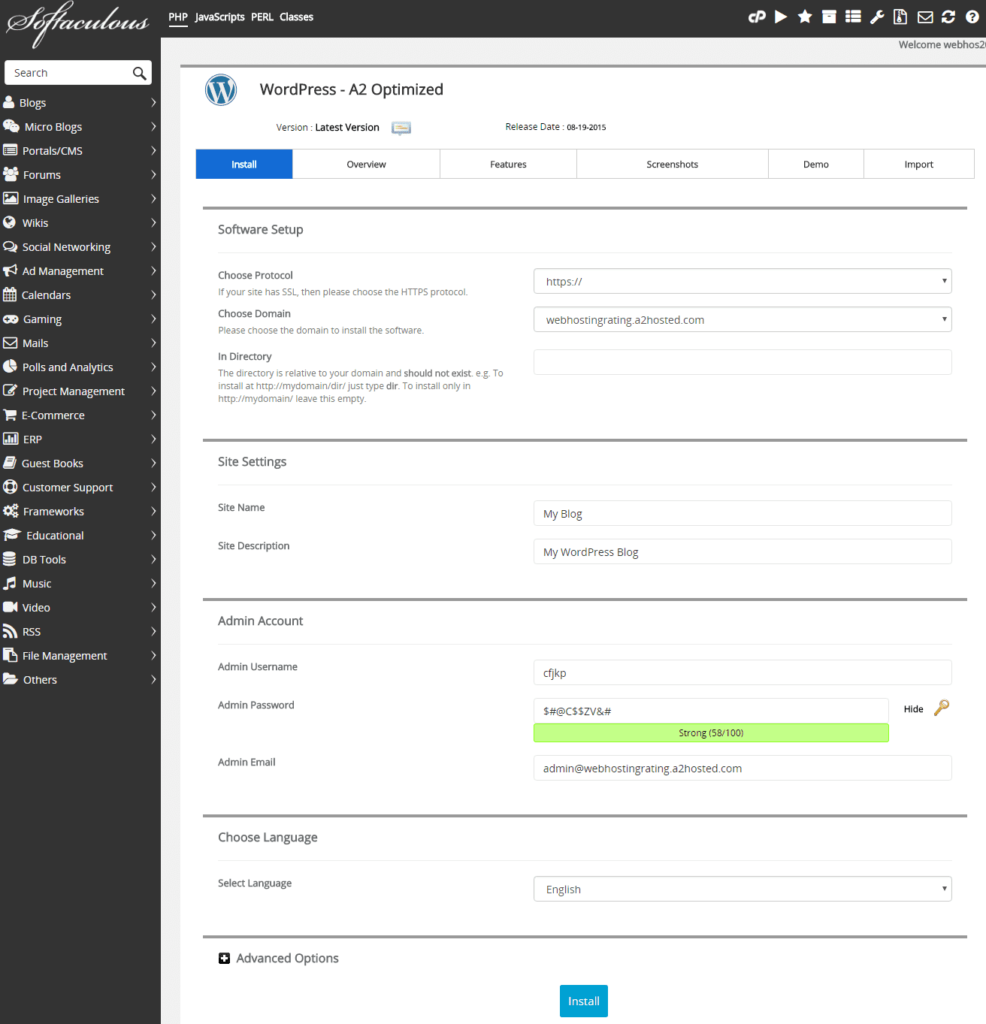
Now, Click on the Install Button Below.
4. Pick A Beautiful Music Theme
This is the exciting part. You need to beautify your blog. You must install an eye-catchy theme for your blog. A theme simply means how your site will look.
There are over millions of themes available, but you would want to settle for a theme that makes sense for a music blog. There are free and paid themes. Free themes are limited; you won’t be able to customize your blog to the best.
Here is a list of the best Themes for a Music Blog, Just click and download anyone you want.
- Kentha
- Mixone
- Phase
- Musico
- Reinar
- Snakepit
- Soledad
- Newsmag
- Newspaper
- Bimber
- JNews
- Mozo
- ShoutOut
- Muse
For more beautiful themes, you can check Studiopress or Theme Forest.
Remember to login to your WordPress with (yourdomain.com/wp-admin/) without the brackets. You will be asked to provide the username and password you used while installing WordPress.
Once logged in, hover to Appearance >> theme >> Upload New. Then upload the theme you downloaded.
Before moving forward, make sure to read this article to learn essential things to do after installing WordPress. Please read it so you understand how to use WordPress. See the link here.
5. Install Important Plugins
Even though you are less familiar with how WordPress work, plugins are used to add unique functionalities to a blog.
For instance:
If you want to add a contact form to your blog, you need a plugin for that. It depends on your needs, but there are over 54,000 plugins and still counting.
You don’t need to install too many plugins; a few ones that are only essential to your blog is enough. I already helped you list the important plugins you need.
Read This: Important Plugins for WordPress blog (+ Installation Process)
6. Create Important Pages
Some pages are vital for blogs. These pages will allow readers/fans to know a few things about you and your blog.
For example, Contact page will allow your audience to contact you for a collaboration, endorsement, or advertisement effortlessly.
Even though I have written a blog post on the essential pages for a blog, you should also think of pages you can add to your music blog so it looks unique.
You want to know how to create a page and what pages you should add to your blog? Then read this guide here.
7. Upload Your First Music (Tracks) to your Blog
Now that I have shown you How to start a successful music blog, You are already asking yourself, “How Do I Download Music To My Blog?”. It’s easy. I believed you know how to install a plugin, Now download, install, and activate the Cubecolour Plugin.
That is what you will be using to upload music (tracks) to your blog. The music you upload can be listened to by your fans. This is how it will look like:
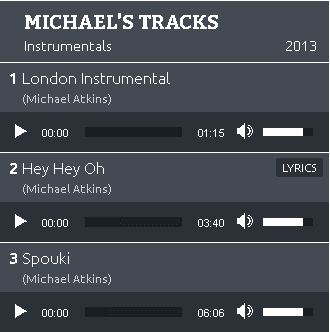
If you want people to download music from your blog or thinking of how to start a music download website, you should download the Easy Media Download Plugin.
After downloading the plugin, make sure to activate it and test its functionality. It’s easier than you imagine.
Most commonly, artists want fans to stream their music on iTunes or boom play. This is why I provided 2 options.
How Do Music Bloggers Make Money?
Regardless of whether you are starting your music blog, music review blog, or music download blog, You can make alot of money from your blog.
Below are 4 ways how Music Bloggers make Money:
Make Money from Streaming
I am not an artist, so I buy or stream music from various streaming platforms. Artist makes lots of money if they have a loyal fan base who consume their songs consistently.
This option is only available for a music artist. You can’t stream the music you do not own.
Affiliate Marketing
Affiliate marketing is the best way to make money from any type of blog. It means you earn small commissions by referring products on your blog.
There are tons of product a music blogger can promote to make money. Musical instruments are the most visible product your fans/readers are likely to buy. Once they purchase through your link, you earn a commission. For a start, register for Amazon Affiliate.
Sell Ad Spaces
If your music blog has lots of traffic, companies will pitch you for collaboration. You sell ad space at your reasonable price.
This might be the most profitable way to Earn Money from a music blog because ads space is expensive and usually a long time pay.
Conclusion on How to Start a Music Blog
If you have been asking yourself “How Do I Start A Music Blog?”, I believed this guide would be handy. Go through it again from start to finish.
I have just explained How to start a successful Music Blog in 7 steps—wishing you success on your new blog.
Feel free to ask questions, And also share with friends.

FOLAJOMI BALLO
I am a Digital Marketer, Blog Analyst. I help new Bloggers with powerful tips to grow their Blog Fast.


Leave a Reply